Friday, February 22, 2013

How to Make Polymer Clay Cats

How to Make Polymer Clay Cats

from wikiHow - The How to Manual That You Can Edit
Creating these fun creatures is not difficult and will start your own sculptured collection. They are great to give as gifts, or just to add them to your shelf containing other precious art pieces.


For More Information's about the Marble Sculptures please visit Here!


Steps

Start by kneading the clay into a ball. Squish and roll it and warm it until is is a soft pliable consistency. Make it spherical and work it from there.


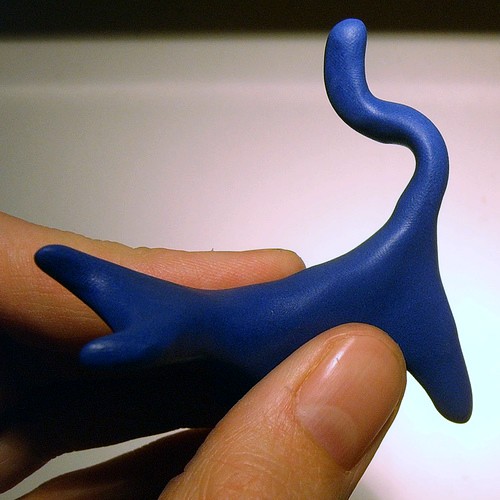
Pull out the various appendages: Four more-or-less equal legs, a longer tail and a fatter head. Give the head a couple of ears, and it should already be starting to look a little bit like a cat.

Keep sculpting until it's a plausible cat shape. It might even have some personality - if so, you might like to go with it.


Keep making the tail more tail-like, keep making the head more cat-like, and hopefully a personality will emerge, whether through design or of its own accord.


Roll out a sausage of glow-in-the-dark clay for the eyes (it’s easier to divide a sausage evenly). Surprise cat eyes glowing in the dark are amusing but use your own personal preference.


Split the sausage into two equal parts and roll them into balls. Work carefully on the eyes, as they are the single most important part of almost any critter. Every little change or move can change the look. For example, unevenly sized eyeballs give an air of derangement. So take care when working with them but be prepared for them to surprise you.


Attach the balls to the front of the head, and presto! You now have a cat that can stare at people.


Split a very small black sausage of clay in half and roll up the pieces to make the pupils. Attach them to the eyes. This is one of the most delicate parts of the whole process, because the amount of clay involved is so tiny and black; you may need to use a sculpting tool or a blunt knife to attach them to the eyeballs.


Give the cat eyelids (optional). You can give the cat upper and lower lids, or stick with just upper lids. Make them from a semi-circle of clay, created by forming a ball, then squashing and halving it.


Shape the lids into rough semicircles and carefully affix them at a precise angle. The way that the lids are attached can easily make the difference between a critter which is sweetly looking for affection, and one which is brimming over with malevolence.Take care in attaching them


Carefully concentrate on the details of its body language. Make the cat look the way your imagination and artistic nature take you.


  • A tail is a beautifully expressive thing
  • The set of a cat’s ears and the angle of its head can tell you a great deal.
  • The way it is standing is crucial.
Take care to make the texture of the piece as smooth as you want it with gentle rubbing, and correct any minor flaws. Then place it on a baking tray, laying it on its side or supporting it around the middle, because unbaked polymer clay legs are flimsy, and become softer while being baked. Place the tray in an oven preheated to 130° C (265°F), and bake for 20-30 minutes according to the instructions that come with the clay.

Tips

  • The directions provided in this article are to assist you to learn how to sculpt this piece. The final sculpture that you create, however, should be guided by your own creativity; after all, it will live in your home, and it should reflect the artist in you.
  • Use any color that pleases you; be creative and make it multi-colored if you wish.

Warnings

  • Before the piece is hardened, be especially careful with the legs. Handle them gently, and grasp it lightly around the belly. The shape will not remain until you have baked it.

Things You'll Need

  • Purchase any brand of oven-baking polymer clay, such as Sculpey III, Premo or Fimo Classic or Soft.
  • Colors of your choice.
  • For the pupils buy black or other dark polymer clay.
  • For the irises, white, glow-in-the-dark or green polymer clay work well.

Related wikiHows


External Links

  • oolong blog Original source of this article. Shared with permission.
Article provided by wikiHow, a wiki how-to manual. Please edit this article and find author credits at the original wikiHow article on How to Make Polymer Clay Cats. All content on wikiHow can be shared under a Creative Commons license.

Thursday, February 21, 2013

How to Mix Plaster for Sculpture

How to Mix Plaster for Sculpture

from wikiHow - The How to Manual That You Can Edit
Mixing plaster with a "rule of thumb" method doesn't require precise measurements. Sculptors typically use this method to mix small to moderate amounts of plaster (less than five gallons/22 liters) for molding and casting. The same instructions apply to all standard gypsum plaster products, such as Plaster of Paris, Hydrocal, Densite, etc.


For More Information's about the Marble Sculptures please visit Here!


Steps

  1. Estimate the amount of mixed plaster and silica your project requires. Remember it is 1/3 plaster, 1/3 silica flour and 1/3 water. Experience is the best guide here, so as a beginner you will just have to make your best guess, then mix extra to be sure you have enough. Use commonsense.
  2. Premix plaster and silica flour.
  3. Pour clean, lukewarm water into an empty, flexible mixing container. A a standard two-gallon (7.5 liter) plastic bucket is a good container. The amount of water should be approximately one third the total amount of mixed plaster/silica you estimated in Step 1.
  4. Add dry plaster and silica to the water. Gradually pick up handfuls and sift the powder through your fingers. This will break up any clumps, letting the powder fall into the water. Work quickly, but avoid dumping the plaster into the water. Don't stir or mix the combined water and plaster/silica.
  5. Continue sifting plaster/silica into the water. Watch for it to start sinking slowly. Eventually some of the powder will stay on top of the water. As you add more plaster, distribute it to areas that still have water on top.
  6. Stop adding plaster/silica when there is no more standing water in the bucket. The surface of the combined water and plaster/silica should be mostly grayish in color, with some areas of white dry powder. Don't mix it yet!
  7. Let the bucket sit for a few minutes. Let it stand during the time that you make any final preparations for your project. If you are molding or casting with the plaster, this is a good time to double-check that you have applied the proper release agent to your pattern or mold.
  8. NEVER mix the plaster with your hands. Plaster reaches a high temperature as it reacts chemically with the water and can cause serious burns!. Use a wooden spoon or similar instrument as one would use an egg beater: Reach down to the bottom of the container and use a side-to-side movement like an exaggerated "hello" wave.
  9. Try to eliminate any lumps and break them up. When thoroughly mixed, the plaster is ready to use in your project.

Video

Tips

  • The water temperature makes a difference. Hot water will speed up the setting of the plaster; cold water will slow it down. Depending on your project, you may want to use either hotter water for faster turnaround when pouring molds or cooler water for a slower process.
  • Plaster tends to leach moisture from skin. You may want to use hand lotion after mixing. Almond oil is excellent, as are your normal moisturizers.
  • The easiest way to clean up unused plaster is to let it harden in the mixing container. It can then be popped out into a trash can easily by turning it upside down and hitting the bottom and sides of the container with your hand (hence the importance of using a flexible bucket).
  • You can use any movement you like for mixing the water and plaster, but avoid whipping air bubbles into the mix. Bubbles can be detrimental to the surface of your mold or casting.

Warnings

  • Always wear a dust mask as the inhaled plaster dust particles will mix with fluid in your lungs and harden there. This is very dangerous and easily avoided.
  • NEVER use hands to mix plaster or apply plaster to set directly on any body parts or skin- serious burns have occurred resulting in amputation of fingers and limbs.
  • Never pour plaster down a sink or other drain. It can solidify and ruin the plumbing. Dispose of unused plaster in the trash. Rinse wet plaster off hands in a bucket of water before washing them in the sink.
  • Avoid getting plaster on clothing or other items of value. It can be very difficult to remove from fabric and other porous surfaces. However, if there is an accident and it spills on fabric, it's worth trying to remove it. Don't automatically deem any soiled item ruined.

Things You'll Need

  • Plaster (dry powder)
  • Source of clean water
  • Plastic bucket or other flexible mixing container
  • Project needing mixed plaster

Related wikiHows

Article provided by wikiHow, a wiki how-to manual. Please edit this article and find author credits at the original wikiHow article on How to Mix Plaster for Sculpture. All content on wikiHow can be shared under a Creative Commons license.

Monday, February 18, 2013

How to Sculpt Limestone in Your Own Home

How to Sculpt Limestone in Your Own Home

from wikiHow - The How to Manual That You Can Edit
An easy way to make limestone sculptures without the need of fancy tools.

For More Information's about the Marble Sculptures please visit Here!


Steps

  1. Get some CaCO3 (limestone).
  2. Cook the CaCO3 (limestone) at high temperatures until it turns into a crumbly powder.
  3. Take the CaO (the crumbly powder) and thoroughly mix with a small amount of water until paste.
  4. Sculpt the CaH2O2 (the paste) into the desired shape of your limestone and dry. The use of a heat lamp might also be of some benefit if used correctly.

Tips

  • Don't be alarmed if your limestone doesn't look right; normal limestone is formed under intense heat and pressure, yours wasn't.
  • CaCO3 (limestone) ---> CaO (powder) + H2O (water) ---> CaH2O2 (paste) ---> CaCO3 (limestone)

Warnings

  • Don't use oil.
  • Danger! The CaH2O2 (paste) is a strong base. Very corrosive!
  • This powdery and paste substances can burn skin slowly. The more moisture involved, the greater the burn.

Things You'll Need

  • limestone
  • rubber gloves (for handling the CaH2O2 (paste)
  • goggles

Related wikiHows

Article provided by wikiHow, a wiki how-to manual. Please edit this article and find author credits at the original wikiHow article on How to Sculpt Limestone in Your Own Home. All content on wikiHow can be shared under a Creative Commons license.

Friday, February 15, 2013

How to Build a Japanese Garden

How to Build a Japanese Garden

from wikiHow - The How to Manual That You Can Edit
The Japanese garden is relaxing, beautiful, silent. Want to make one? Here's how!


For More Information's about the Marble Sculptures please visit Here!


Steps

  1. Investigate Japanese gardens online, in books, or go and see them; there are many world class Japanese Gardens outside of Japan.
  2. Pick your theme, it might be Zen temple style, which tends to be very different than the Shinto, or the imperial style. Some are for contemplation & meditation, some are for strolling through so there are other aspects to consider.
  3. There are elemental characteristics that are important to Japanese Gardens - stone (known as Suseiki), water (ponds, streams etc) as well as planting alignments are quite important.
  4. There are also sculptural aspects such as lanterns, pavilions, pagoda, stepping stones & gravel, water bowls, deer scarers, fencing or screens etc
  5. Pick a nice large area. Slopes and small hills add to the charm if you have them, however they can also add to the workload. There are Japanese gardens for both flat and hilly terrain.
  6. Decide on your plants. These vary from bamboo, maples, cherry blossom trees, azalea, camellia, iris, moss etc.
  7. Map out the area. Think about how large the plants will grow, as well as looking forward to how they will look - will they look better as a clump or a singular specimen, does your space allow for a large pond or is a small water feature more allowable? etc.
  8. Expect change - this is a central part of the Buddhist philosophy, but it's also part of the garden as it will change with the seasons such so there will be flowering periods, no leaf periods etc. By expecting it you can use it for maximum impact by putting plants where they will stand out as the leaves change colour etc.
  9. Decide where the plants are going to go. Work with the landscape as that will make the garden more natural, but also more beautiful than heavy terrascaping.
  10. If you want a pond select a medium area. (Ask a landscaper for details on the pond)
  11. Decide where your bench is going to be - you want to have it were you can sit and take in the future garden.
  12. Buy the plants that you want, and put them in the marked spots.
  13. Examine them in-situ while still in the pots to decide on appearances before putting them in the ground. You may need to redesign your plan.
  14. Build the pond according to directions from the supplier. Fill the pond with water and allow it to settle for a few days before testing and adjusting the PH of the water (if needed) before adding plants and fish.
  15. Install your added sculptures such as large tall stones, stone lanterns or pagoda etc.
  16. Put a bench in a place where you can see the pond and a clear view of all the flowers.

Video

this should inspire you to see what a real Japanese garden looks like


Tips

  • lanterns are good for a impressive look (stone looks best)
  • light candles around to make it look more impressive at night
  • the bench should be a long stone with two stones under it for best results
  • fish can be a great addition to any pond
  • have a contractor come out and help you plan out your garden.

Things You'll Need

  • large area
  • a contractor
Article provided by wikiHow, a wiki how-to manual. Please edit this article and find author credits at the original wikiHow article on How to Build a Japanese Garden. All content on wikiHow can be shared under a Creative Commons license.

Thursday, February 14, 2013

How to Choose a Frederic Remington Sculpture Reproduction

How to Choose a Frederic Remington Sculpture Reproduction

from wikiHow - The How to Manual That You Can Edit
Frederic Remington (1861 - 1909) created 22 subjects in bronze, beginning with The Broncho Buster in 1895. These subjects were cast in numbers according to retail demand. Since the copyrights expired mid-20th century, the sculptures have been available to anyone who wants to make and sell copies. They're offered today in a wide spectrum of venues. Quality varies greatly.


For More Information's about the Marble Sculptures please visit Here!


Steps

1.   Do your homework. Visit authentic casts at museums.


2.   Check out Icons of the West: Frederic Remington’s Sculpture by Michael D.Greenbaum at your library. Between reading and looking at the pictures, this book will give you an in-depth education. It also lists locations of authentic casts.


3.  Now that you are a connoisseur, you are prepared to evaluate reproductions. You can select reproductions that best represent the artist's original work. Your newfound expertise will prepare you to best enjoy a reproduction that you’ve carefully chosen.


Tips

  • Reproductions come in a diversity of sizes, from tiny to larger than life.
  • They also come in a wide range of prices, which are often not especially correlated to size or quality.
  • Reproductions are almost always begun by an artist who works on a new model based on photographs of a Remington subject. Occasionally, such standard items are incorrectly called restrikes or recasts. These terms indicate that the mold that created the item was taken from the surface of an authentic sculpture. If the seller makes the claim of selling recasts, you should expect them to be able to provide information about which cast was used for the mold, and a convincing narrative of how it came about.
  • A few museums providing extensive exhibits of original Remington sculptures are: Frederic Remington Art Museum[1], Amon Carter Museum[2], Gilcrease Museum[3] and the Buffalo Bill Historical Center[4].

Warnings

  • Reproductions are only for fun and personal enjoyment. They should not be acquired with the expectation that they will appreciate in value.
  • Beware of a seller who suggests that their reproduction is rare, or that it's worth more than they're asking for it.
  • Certificates of Authenticity are often associated with very ordinary reproductions, and should not be taken at face value.
  • There are plenty of Remington "reproductions" in the marketplace that are not based on Remington sculptures. These shouldn't have Remington's name on them at all.
  • It is rare, but possible to visit a museum and see an inauthentic Remington sculpture on exhibit.

Related wikiHows


Sources and Citations

  1. www.fredericremington.org
  2. www.cartermuseum.org
  3. www.gilcrease.org
  4. www.bbhc.org
Article provided by wikiHow, a wiki how-to manual. Please edit this article and find author credits at the original wikiHow article on How to Choose a Frederic Remington Sculpture Reproduction. All content on wikiHow can be shared under a Creative Commons license.

Wednesday, February 13, 2013

How to Maintain Indoor Fountains

How to Maintain Indoor Fountains

from wikiHow - The How to Manual That You Can Edit
Your indoor fountain can be kept in clean, optimal condition when you take steps to maintain your fountain on a routine basis. Although indoor fountains may be exposed to fewer natural elements, they can still develop algae and bacterial growth or experience low water levels due to evaporation. In addition to performing general maintenance on your indoor fountain, you must also clean the inside of your fountain and the pump at least once per month to prevent algae and mineral deposits from forming. With regular, proper care and maintenance, you can maintain the functionality and appearance of your indoor fountain and all its working components.

For More Information's about the Marble Sculptures please visit Here!


Steps

General Maintenance
  1. Keep your fountain pump submerged in water at all times. This will help circulate the water in your fountain and keep it filtered, in addition to minimizing the growth of algae. Your fountain pump may also become dry and burn out if it is not submerged in water consistently.
    • Examine the water level around your fountain pump on a daily basis. This will allow you to become familiar with how often you need to add water to the fountain.
    • Add water to your fountain as needed. This factor will vary depending on the indoor climate in which the fountain is located. For example, if the fountain resides in a warm, dry indoor climate, you may need to add water to the fountain on a daily basis.
  2. Keep your fountain pump powered on constantly. This will help keep your fountain water clean and prolong the life of your pump; as turning the power off and on continually may cause the motor in the pump to wear at a faster pace.
    • Ask a friend or family member to help maintain the water level in your fountain when you need to travel. This will prevent you from having to power off the fountain completely.
  3. Use distilled water in your water fountain. Using distilled water is a natural way to keep your fountain clean and prevent algae growth; whereas tap water may contain minerals or other metals that can solidify and build up on the walls of your fountain and the pump.
Cleaning Procedure
  1. Turn off and unplug your fountain. This will eliminate your risk of electrical shock as you clean the fountain.
  2. Remove any stones or pebbles from the inside of your fountain. Stones will need to be cleaned before they are placed back into the fresh water.
  3. Remove the fountain pump from the fountain.
    • Consult your fountain's manual or contact the manufacturer directly if you are unsure how to remove the pump safely from the fountain.
  4. Remove the water from your fountain. Depending on the size of your fountain, you can either empty the fountain over a sink or use a shop-vac to remove the water.
  5. Clean your fountain and its components.
    • Use a soft, non-abrasive sponge to avoid scratching or damaging the fountain's interior and working parts.
    • Clean the fountain, pump, and stones using a cleaning mixture of warm water and mild liquid soap, or use a commercial calcium lime removal product. For an all-natural alternative, spray distilled white vinegar on the fountain's interior and parts, then scrub using a wet sponge.
    • Use a toothbrush to clean any small, tough corners or spots that are hard to penetrate or reach with the sponge.
    • Use a soft, clean rag or cloth to dry and remove any excess cleaning mixture from the fountain's interior and parts.
  6. Place the fountain pump and stones back into the fountain.
  7. Refill your fountain with fresh, clean water. The procedure for refilling your fountain will vary depending on its size.
    • Pour bottled, distilled water into your fountain or use tap water from a sink. Depending on the size of your fountain, you can refill the fountain from the inside of a sink or use a bucket to transport the water from the sink over to the fountain.
  8. Plug in your indoor fountain and power the fountain on.
    • Observe the fountain for a few minutes to make sure the pump is properly re-installed, and that the fountain work efficiently.

Warnings

  • Do not use a copper cleaning product on your fountain if it is made from copper with a powder-coat finish. Copper cleaning products will remove the powder-coat finish and may diminish your fountain's appearance.
  • Do not clean your indoor fountain with bleach or similar abrasive cleaning solvents or sponges. The properties and chemicals used in bleach and other abrasive cleaning products may cause your fountain's elements and parts to erode.

Things You'll Need

  • Distilled water
  • Shop-vac
  • Soft sponge
  • Mild liquid soap
  • Toothbrush
  • Soft rag or cloth
  • Calcium lime removal product (optional)
  • Distilled white vinegar (optional)

Sources and Citations

Article provided by wikiHow, a wiki how-to manual. Please edit this article and find author credits at the original wikiHow article on How to Maintain Indoor Fountains. All content on wikiHow can be shared under a Creative Commons license.

Tuesday, February 12, 2013

How to Make a Life Cast Sculpture

How to Make a Life Cast Sculpture

from wikiHow - The How to Manual That You Can Edit
Making sculpture from life has as many variations as there are body parts (this article uses the hand as an example). Variations will be driven by container size and will effect material measurements. There are many materials you can use to pour your final sculpture. Gardencast is used here.

For More Information's about the Marble Sculptures please visit Here!

Steps

  1. Think about what you want to express and decide which hand shape will express that for you.
  2. Make a container the size of your hand out of cardboard or foam core.
  3. Mix dermagel mold material to pour into your mold.
    • Measure 3 cups dermagel into a ziploc bag.
    • Measure 4 1/2 cups water in a bowl.
    • Pour water into the ziploc bag with the dermagel. Mix until smooth -- work quickly, it gets firm in 4 minutes or so.
    • Pour dermagel into your container 1/2 inch from the surface.
  4. Put your hand in the mold, and keep it as still as possible. After about 5 minutes (when dermagel is firm), release hand sowly by wiggling your fingers and separating the mold edge from your hand.
  5. Cut off any unnecessary material that wrapped around your fingers. There should be no severe undercuts. If there are you will be digging dermagel out with a tooth pick from your final sculpture.
  6. Clean your mess with water.
  7. Prepare clean bowls and water for Gardencast.
  8. Mix Gardencast
    • Sift 1 1/2 cups sand 2 1/2 cups Gardencast into 3/4 cup water. You are aiming for very grainy pancake batter.
    • Add 1 Tbsp of concrete colorant.
    • Use a wire whisk or drill attachment or hand to mix
    • Let it rest for about 5 minutes.
  9. Pour Gardencast into the most shallow place in the mold, usually the palm. Let the liquid do the work.
  10. Fill until covered and wait about 10 minutes.
  11. Insert hardware and sign your piece. Keep an eye on firmness. You want the hardware to sink in but not disappear; one minute it is like quicksand and the next it can get too hard to put your hardware in.
  12. Scrape your signature into the Gardencast.
  13. Wait until it is hard -- at least an hour or over night.
  14. Strip away container and dermagel surrounding your hand and behold your glorious hand sculpture.
  15. Chase away any imperfections with a butter knife.

Tips

  • Wear a respirator when mixing powder material.
  • Don"t get casting material in your eyes.
  • Wear goggles.

Warnings

  • Don't ingest any of the supplies.
  • Work outside and cover any surfaces that you don't want to get casting material on.
  • If you work inside cover counters and floor with plastic.

Things You'll Need

  • Household items you might have or can get at the hardware store would be:
  • Duct tape, scissors, cardboard, foam core, a utility knife, plastic bags, zip lock bags, butter knife,sponge,tablespoon
  • Two plastic, metal or glass bowls that you can mix in and will not eat out of later.
  • Dust mask
  • Latex gloves
  • Dermagel and Gardencast from sculpture supplier
  • D rings from hardware store.

Related wikiHows

Article provided by wikiHow, a wiki how-to manual. Please edit this article and find author credits at the original wikiHow article on How to Make a Life Cast Sculpture. All content on wikiHow can be shared under a Creative Commons license.

Monday, February 11, 2013

How to Make Animal Sculptures from Recycled Materials

How to Make Animal Sculptures from Recycled Materials

from wikiHow - The How to Manual That You Can Edit
Making animal sculptures from recycled materials can be highly rewarding, perhaps even more enjoyable that a real animal- and it's free!

For More Information's about the Marble Sculptures please visit Here!

Steps

  1. Find some old toilet paper roll tubes.
  2. Coat them in white paint.
  3. Attach pieces of cornflakes onto one ends like ears.
  4. Attach eggs shells like noses on the front.
  5. Get some old cooked well spaghetti and attach like a tails.
  6. Make peas into small feet on front and backs.
  7. Get old bits of toilet paper and you can make whiskers.

Things You'll Need

  • loo rolls
  • white paints
  • cornflake
  • spaghetti
  • peas
  • loo papers

Related wikiHows

Article provided by wikiHow, a wiki how-to manual. Please edit this article and find author credits at the original wikiHow article on How to Make Animal Sculptures from Recycled Materials. All content on wikiHow can be shared under a Creative Commons license.

Friday, February 8, 2013

How to Make a Wish Using a Buddha Statue or Statuette

How to Make a Wish Using a Buddha Statue or Statuette

from wikiHow - The How to Manual That You Can Edit
Have you ever wished on a "wishing star" and only wished for your wish to come true? This is now a better, more fun way to wish after looking at stars gets old.

For More Information's about the Marble Sculptures please visit Here!


Steps

  1. Find a Buddha statue or statuette that you can pick up easily.
  2. Set it on a flat surface. A table will do fine.
  3. Pick up the statue
  4. Set it down and once it has been set completely on the surface, make your wish.
  5. Pick it up, after you have made your wish. If it is hard to pick it up, then your wish will come true!

Things You'll Need

  • Buddha Statue or Buddha Statuette
  • Flat surface

Related wikiHows

Article provided by wikiHow, a wiki how-to manual. Please edit this article and find author credits at the original wikiHow article on How to Make a Wish Using a Buddha Statue or Statuette. All content on wikiHow can be shared under a Creative Commons license.

Wednesday, February 6, 2013

How to Sculpt With Concrete

How to Sculpt With Concrete

from wikiHow - The How to Manual That You Can Edit
Who says concrete can only be used for construction? With the right techniques and application, concrete can be a wonderful sculpting medium.

For More Information's about the Marble Sculptures please visit Here!

Steps

  1. Note that most concrete work is done using a form or mold. If the sculpture you want to create is orthogonal in shape you will want to make a form out of plywood and 2x4's in order to contain the concrete until it is set. When the concrete is set you can remove the form and your sculpture, or part of it will be cast in the shape of the inside of the mold you have created.
  2. Be aware that if you want to create a sculpture of a more organic nature using concrete, your task will require a different technique . you will need to build a steel framework using steel, rebar, and "pencil" rod (up to 1/4 steel rod) welded together in the basic shape of your sculpture. You will also need to add fiberglass to your concrete mixture, and the mixture will be a little drier than for pouring as you will be applying it to your framework by hand.
  3. Purchase the cement and the aggregate, or the sand, pebbles and small rocks that turn cement into concrete. The instructions for how much of each of these to add to the bag of cement is on the bag. Aggregate will not be needed if you are sculpting by hand
  4. Continue to build the formwork for the shape you wish to cast. Keep in mind that the concrete will harden into a mass of solid rock like stuff once it is set. You will have to design the mold to be able to be removed from the form. Think ahead. The mold can be constructed out of plywood, the larger the mold, the thicker the plywood, and held together on the outside of the mold with 2 x 4 lumber. Again the larger the mold, the larger the lumber (2x6, 2x8 etc...). You might want to check some books on residential construction to see how concrete forms are constructed for some tips on building formwork.
  5. Coat the inside of the form. Do this with wax, or silicone or some other material that allows for easy release of the mold after the concrete is set.
  6. Understand that if the concrete is very large you should think about adding some steel reinforcing to the center of the mold, ie, rebar. This should not be strictly necessary if the sculpture is not more than a few cubic feet of concrete. Remember, concrete is very strong in compression and weak in tension, steel is strong in tension. So if your sculpture is going to have any tensile strength you will need to add some rebar to the inside of the concrete. keep the rebar 3inches away from the surface of the concrete on all sides.
  7. Mix and pour the concrete into the mold. Take care when filling the mold to avoid any air pockets forming in the concrete. You can vibrate the concrete or push it around with a poky thing of some kind while you are filling the mold.
  8. Wait at least 48 hours to unmold the concrete. keep the concrete damp while it is curing. The concrete will cure for a month but you only need to keep it damp for a week or so. You can cover the sculpture in plastic to ensure it stays damp while it cures.

Tips

  • You can buy concrete colorants and stains to turn ordinary grey concrete different colors.
  • Check out books on construction for tips on how to build formwork.
  • Check out the various organizations that work with cement and concrete for more information on working with this material.
  • For concrete sculpting inspiration check out: **http://www.imaginationcorporation.ca/ **http://www.signcraft.com/pdfs/97-127002.pdf

Warnings

  • Concrete can burn your skin and eyes and lungs, wear gloves, protective clothing and protective eye-wear and a dust mask.
  • If you get the concrete on your skin wash it off right away.
  • Do not breath concrete dust as you mix the concrete - wear a dust mask.

Related wikiHows


Sources and Citations

Article provided by wikiHow, a wiki how-to manual. Please edit this article and find author credits at the original wikiHow article on How to Sculpt With Concrete. All content on wikiHow can be shared under a Creative Commons license.

Tuesday, February 5, 2013

How to Create a Packing Tape Sculpture

How to Create a Packing Tape Sculpture

from wikiHow - The How to Manual That You Can Edit
Creating a sculpture doesn't have to require a trip to the art store for sculpting materials and tools. Did you know that you can use packing tape to make sculpture casts of objects such as toys, household appliances, or even yourself? Tape casting is a "dry" and quick process and a good alternative to paper mache. Follow these steps to create your own tape sculpture!

For More Information's about the Marble Sculptures please visit Here!

Steps

1. Choose a valueless object with a simple surface area such as a toy doll or a ball.

2. Wrap the object completely in clingwrap. If you do not have this or do not want to use it, you can wrap it sticky-side up first. This method also allows you to stick things on it before doing a layer of tape sticky-side down.
  

 3.Tape over it with packing tape.

4. Using a pair of scissors (or a razor knife), make an incision in the tape cast and cut a seam to allow for the original object's release.

5. Once the cast has been removed, remove any excess cling wrap from inside.

 6. Reseal the cast with packing tape.

7. Finished.

Tips

  • Tape sculptures can be painted on with most paints. They can also be stuffed with newspaper, foam, etc.
  • Although they may seem like a better deal, the knock-off brands are almost never a better deal. One of the authors of this page suggests buying Duck tape brand packing tape.
  • More expensive "heavy duty" or "super strength" tapes generally produce stronger casts. Or, you can use more layers of tape. Another option to make tape sculptures sturdier is to cut plastic strips from coke bottles and tape them in areas needing support.
  • A heat gun can produce interesting surface effects if used carefully.
  • If making a self cast:
    1. The casting will work best if it's done in three parts: A: Legs and torso. B: Mid-section. C: Arms

Warnings

  • (Making a self cast)
  • When releasing yourself from the cast use scissors (not an exacto knife). Bandage scissors which can be purchased at any drugstore for a few dollars work great to protect your skin from being cut/nicked while cutting.
  • Don't wrap the tape too tight or it will be hard to cut away and will also cut off circulation causing numbness.
  • Do NOT attempt to make the head of your self cast without making it possible to breathe! When you make the head, you must leave a hole or two under your nose.
  • (Making an ordinary cast)
  • Make sure all of the surfaces of the object you are making a cast of are covered with plastic wrap. Packing tape is very adhesive, hard to see, and hard to remove.
  • When you reseal the cast in step 6, be gentle and don't press the "inner layers" of tape together. Remember that the stick side of the packing tape is on the inside. If you get them stuck together, all your hard work is wasted. So BE CAREFUL! (Same goes for when you add more layers of packing tape.)

Things You'll Need

  • Cling film (plastic wrap)
  • Packing tape
  • Scissors (or razor knife)
  • Bandage scissors (for self casts)

Related wikiHows


Sources and Citations

Article provided by wikiHow, a wiki how-to manual. Please edit this article and find author credits at the original wikiHow article on How to Create a Packing Tape Sculpture. All content on wikiHow can be shared under a Creative Commons license.

Monday, February 4, 2013

How to Make a Sculpture

How to Make a Sculpture

from wikiHow - The How to Manual That You Can Edit
You know that you want to express your art, but you want more than drawings! Read this step-by-step article about how to make a sculpture so you can express yourself in 3-D!

For More Information's about the Marble Sculptures please visit Here!

Steps

  1. Brainstorm. Sculptures can have different meanings. They can look cool or look lame. They could have a message on them, or be a picture. Brainstorm what kind of sculpture you want to have.
  2. Collect. Sculptures are known for what they are made out of. You could have a unicorn made of candy wrappers, or a dragon made from Coke bottles. If needed, remember to collect glue as well.
  3. Make a base. All sculptures have to have something to hold them up. It's called the base. It can be showing or not showing. Many sculptures have a basic base made out of sticks. To be more steady, you could use a piece of metal.
  4. Paste. We've all used it. Paste in sculptures is like bread on a sandwich. You have to choose one that will hold up what you are using.
  5. Give it character. If you don't want your sculpture to be a piece of the ground, you have to give it character. For example you could have a news paper unicorn. To give it character glitter paint it.
  6. Paint it. You don't have to paint it if you don't want to. If you do, choose bright eye-popping colors. That will make it stand out.

Video

Tips

  • Outside scraps is not good when you are going to show your sculpture outside, because it will blend in.

Warnings

  • You may get splinters by using rough wood.
  • Try to avoid using super glue.

Things You'll Need

  • Scraps of something
  • Glue

Related wikiHows

Article provided by wikiHow, a wiki how-to manual. Please edit this article and find author credits at the original wikiHow article on How to Make a Sculpture. All content on wikiHow can be shared under a Creative Commons license.